Quick Answer: This guide walks you through installing OpenClaw, NemoClaw, and optionally Nemotron on Ubuntu. The full stack takes about 30 minutes. You need Node.js 24, Docker, and a Linux machine. No GPU required if you use NVIDIA’s cloud inference.
Last updated: March 17, 2026
If you want to run OpenClaw seriously, not just for demos, you need NemoClaw on top and a sane way to host Nemotron locally. This guide walks you through a clean, dev-friendly setup on Ubuntu that keeps the agent in a sandbox from day one.
For context on what NemoClaw is and why it matters, read our overview: NVIDIA NemoClaw: The Security Layer That Makes AI Agents Enterprise-Ready.
Important: NemoClaw is early-stage software (announced at GTC 2026). Expect rough edges. CLI flags, APIs, and defaults may change between releases. Always check the official docs before using this in production.
TL;DR: Prerequisites + Quick Install
For experienced users who just want the high-level steps on Ubuntu 22.04+:
- Install Node.js 24 and Docker:
curl -fsSL https://deb.nodesource.com/setup_24.x | sudo -E bash -
sudo apt-get install -y nodejs docker.io git
sudo usermod -aG docker $USER && newgrp docker
- Install OpenClaw:
curl -fsSL https://openclaw.ai/install.sh | bash
openclaw --version
- Install OpenShell and NemoClaw:
git clone https://github.com/NVIDIA/OpenShell.git && cd OpenShell && ./install.sh
cd ..
git clone https://github.com/NVIDIA/NemoClaw.git && cd NemoClaw && ./install.sh
- (Optional) Run local Nemotron with vLLM or Ollama, then point NemoClaw/OpenShell at it using the appropriate inference profile (see section 2.6).
For everyone else, follow the step-by-step below.
1. Requirements
1.1 Operating system
| OS | Supported | Notes |
|---|---|---|
| Ubuntu 22.04+ | Primary | Recommended for NemoClaw/OpenShell |
| macOS 12+ | Partial | OpenClaw only; NemoClaw needs Linux |
| Windows (WSL2) | Partial | OpenClaw works; NemoClaw expects native Linux |
NemoClaw specifically targets Linux (Ubuntu 22.04 LTS or later). macOS and Windows users can still run OpenClaw, but should treat NemoClaw as a remote sandbox running on a Linux host.
1.2 Software prerequisites
| Software | Version | Purpose |
|---|---|---|
| Node.js | v24 recommended (v22.16 minimum) | OpenClaw runtime |
| Docker | Latest stable | NemoClaw/OpenShell |
| Git | Any recent version | Cloning repositories |
| NVIDIA OpenShell | Latest from GitHub | Secure runtime layer |
1.3 Hardware: Nemotron model requirements
Choose a Nemotron model based on your available hardware. If you need help selecting dedicated hardware for this stack, our Ultimate Mac Mini Guide: Secure OpenClaw AI in 2026 covers the best options.
| Model | Total params | Active params | 4-bit VRAM | 8-bit VRAM | Best for |
|---|---|---|---|---|---|
| Nemotron-3-Nano-4B | 4B | 4B | ~3 GB | ~5 GB | Quick local tests |
| Nemotron-3-Nano-30B-A3B | 31.6B | 3.2B | ~24 GB | ~38 GB | Dev machines (RTX 3090/4090) |
| Nemotron-3-Super-120B-A12B | 120B | 12B | ~64-72 GB | ~128 GB | DGX / multi-GPU setups |
Recommended dev spec for Nano 30B: GPU with 24 GB VRAM (RTX 3090/4090), 32 GB+ system RAM, 50 GB+ free storage, 6+ CPU cores.
No GPU? You can still use NemoClaw with NVIDIA cloud inference (API key) and skip local Nemotron. The default profile uses NVIDIA-hosted models.
2. Step-by-step setup
2.1 Install Node.js
# Check existing version
node --version

# If missing or below v22, install Node 24:
curl -fsSL https://deb.nodesource.com/setup_24.x | sudo -E bash -
sudo apt-get install -y nodejs

# Verify
node --version   # Should show v24.x
npm --version
2.2 Install Docker
sudo apt-get update
sudo apt-get install -y docker.io

# Add your user to docker group (no sudo for every command)
sudo usermod -aG docker $USER
newgrp docker

docker --version
docker run hello-world
2.3 Install OpenClaw
# One-line installer (handles Node detection + onboarding)
curl -fsSL https://openclaw.ai/install.sh | bash
During onboarding you will:
- Acknowledge the security risks (read this carefully)
- Choose Quickstart for your first setup
- Select an AI provider. Choose “Skip for now” if you plan to use local Nemotron
- Select model filtering. “All Providers” then “Keep Current” is fine for dev
Verify:
openclaw --version
Alternative (npm):
npm install -g openclaw@latest
openclaw onboard --install-daemon
2.4 Install NVIDIA OpenShell
NemoClaw uses OpenShell as its secure runtime/sandbox.
git clone https://github.com/NVIDIA/OpenShell.git
cd OpenShell
./install.sh
Follow the prompts. When in doubt, accept the defaults for a single dev machine.
2.5 Install NemoClaw
cd ..
git clone https://github.com/NVIDIA/NemoClaw.git
cd NemoClaw
./install.sh
The installer will:
- Set up the NemoClaw CLI
- Detect your existing OpenClaw install
- Configure inference (cloud vs local)
- Create a sandboxed environment and default policies
On success you should see something like:
Sandbox      my-assistant (OpenShell runtime)
Model        nvidia/nemotron-3-super-120b-a12b (NVIDIA Cloud API)

Run:         nemoclaw my-assistant connect
Status:      nemoclaw my-assistant status
Logs:        nemoclaw my-assistant logs --follow
Note: CLI names and output formats may change in future releases. Check the built-in --help commands and official docs if what you see is different.
2.6 Set up local Nemotron (optional but recommended)
If you want fully local, private inference instead of cloud, choose one of these options.
Option A: Ollama (simple)
curl -fsSL https://ollama.ai/install.sh | sh

# Example: pull Nemotron Nano 30B (fits 24 GB GPUs)
ollama pull nemotron-3-nano:30b
ollama serve
Option B: llama.cpp (fine-grained control)
git clone https://github.com/ggerganov/llama.cpp
cd llama.cpp
cmake -B build -DGGML_CUDA=ON
cmake --build build --config Release -j"$(nproc)"

# Download quantized Nemotron GGUF
pip install huggingface_hub hf_transfer
HF_HUB_ENABLE_HF_TRANSFER=1 huggingface-cli download \
  unsloth/Nemotron-3-Nano-30B-A3B-GGUF \
  --local-dir ./models/nemotron-nano \
  --include "*UD-Q4_K_XL*"

# Start server
./build/bin/llama-server \
  --model ./models/nemotron-nano/Nemotron-3-Nano-30B-A3B-UD-Q4_K_XL.gguf \
  --alias "nvidia/nemotron-3-nano-30b-a3b" \
  --ctx-size 16384 \
  --temp 0.6 \
  --top-p 0.95 \
  --port 8001
Option C: vLLM (production-grade)
pip install vllm

vllm serve nvidia/NVIDIA-Nemotron-3-Nano-30B-A3B-BF16 \
  --dtype auto \
  --max-model-len 16384 \
  --port 8000
2.7 Point NemoClaw at your local model
Inference profiles and flags may evolve, but the general pattern is:
# Example: switch to a local vLLM backend
nemoclaw inference set \
  --provider vllm-local \
  --model nvidia/nemotron-3-nano-30b-a3b \
  --endpoint http://localhost:8000
If you are using Ollama or llama.cpp, the provider name/URL will be different. Use the CLI help to see current profile names:
nemoclaw inference list
nemoclaw inference --help
3. Using the stack
3.1 Connect to your sandboxed agent
nemoclaw my-assistant connect
This drops you into an interactive shell inside the sandbox.
3.2 Chat via TUI
Inside the sandbox:
sandbox@my-assistant:~$ openclaw tui
3.3 Single-message CLI call
sandbox@my-assistant:~$ openclaw agent \
  --agent main \
  --local \
  -m "hello" \
  --session-id test
3.4 Monitor and manage
# Sandbox health
nemoclaw my-assistant status

# Stream logs
nemoclaw my-assistant logs --follow

# Inspect underlying OpenShell sandboxes
openshell sandbox list
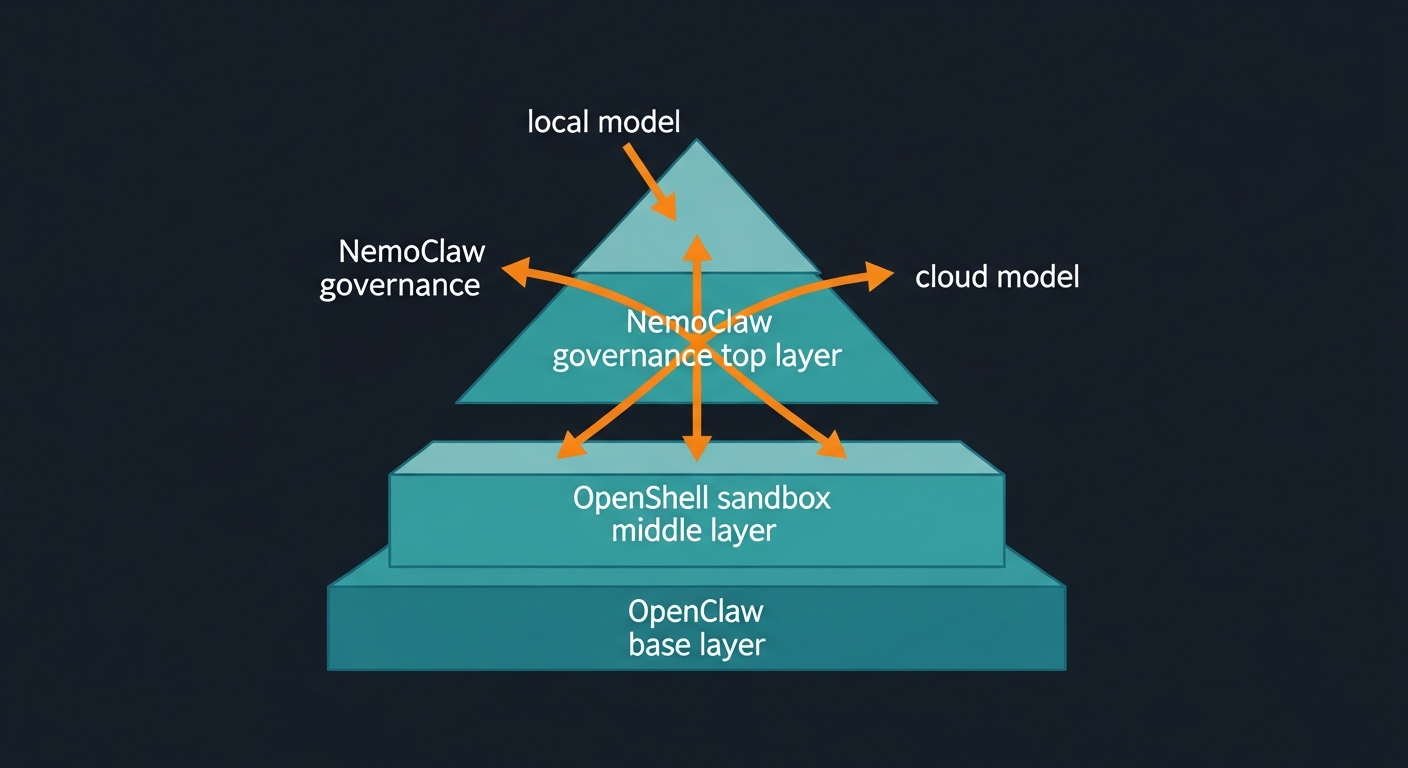
4. Security and protection layers
NemoClaw and OpenShell enforce several layers of protection inside the sandbox.
| Layer | Protection | Typically changeable? |
|---|---|---|
| Network | Blocks outbound connections to non-approved hosts/ports | Policies can be hot-reloaded |
| Filesystem | Restricts reads/writes to specific paths (e.g., /sandbox) | Defined at sandbox creation |
| Process | Limits syscalls and privilege-escalation attempts | Defined at sandbox creation |
| Inference | Routes model calls to approved backends (local vs cloud) | Profiles can be updated |
When an agent tries to reach an unlisted host, OpenShell can block it and surface the request in a terminal UI for your approval, depending on your policies.
For a complete pre-deployment security review, use our companion article: NemoClaw Security Checklist: Lock Down AI Agents Before They Go Live.
For general OpenClaw hardening beyond NemoClaw, see How to Secure OpenClaw (Moltbot): The Ultimate 5-Step Digital Cage.
Note: Exact defaults and toggles may change between releases. Always review current NemoClaw/OpenShell documentation before relying on this in production.
5. Troubleshooting
| Issue | Likely fix |
|---|---|
openclaw not found |
Run npm install -g openclaw@latest or verify your PATH |
| Node version too old | Upgrade to Node 24 using the Nodesource script above |
| Permission denied with Docker | Run sudo usermod -aG docker $USER then log out/in |
| NemoClaw install fails | Ensure OpenClaw and OpenShell are installed cleanly; rerun ./install.sh |
| CUDA out of memory | Use a smaller model or lower --ctx-size; or use cloud inference |
| Sandbox does not start | Run openshell sandbox list and check logs |
| Inference timeouts | Confirm your local model server is running on the correct port |
If something feels janky, remember: this whole stack is still early. Most errors come down to versions (Node/Docker) or a half-installed dependency.
6. Key links
- NemoClaw landing page – overview and docs
- NemoClaw GitHub
- OpenShell GitHub
- OpenClaw docs
- Nemotron models and NVIDIA API keys
- Nemotron GGUF (Unsloth)
Related PacketMoat Guides:
- NVIDIA NemoClaw: The Security Layer That Makes AI Agents Enterprise-Ready – What NemoClaw is and why it matters
- NemoClaw Security Checklist: Lock Down AI Agents Before They Go Live – Pre-flight checks before trusting agents on your network
- Ultimate Mac Mini Guide: Secure OpenClaw AI in 2026 – Best dedicated hardware for running AI agents
- Best Password Managers for Remote Teams (2026) – Lock down credentials before deploying any AI agent
Tye is a CISSP-certified cybersecurity analyst with over 25 years in IT and 15 years specializing in network defense and threat intelligence. He built PacketMoat to bring enterprise-grade security knowledge to everyday people and small businesses.